Tuesday, December 14, 2010

TOMORROW!

Readers,
Can you believe it? I get a note from school yesterday that my handmade items are due on Wednesday instead of Friday! What are they doing to me? Forgive me, but there will not be tutorials on everything, because I had to slap together some things fast!
Here's what I've come up with:

Mens Leather Bracelet

This I had made before for my husband using leather cording. His is tied on, so for a gift I made one using ribbon enders. The tutorial for the sailor braid I found here.

Shrink Plastic Keychains

These are a super simply craft to make. Luckily I had shrink plastic that is able to go through the printer. All you need to do is choose an image, (kid's photos would be great for grandparents). Scale your image to double the size you want the finished piece to be. Print it, cut it, punch a hole for your chain, and bake according to the directions. Easy!

Button Earrings

Most of you can probably do without a tutorial on these cuties! Take an earring post, add E6000 glue, press button on, and let dry. Good thing I make these regularly, so no problem having posts and backs in the house.

Record Bowl

You've probably seen one of these before! I made two of these to send to school tomorrow. I'm not sure if anyone will want them. I actually have one I made, that is perfect for throwing my mail into.
Lastly, I made a placemat purse a couple of weeks ago that I was going to sell in my shop. I wasn't thrilled with the unfinished edges so I couldn't really put a price on it. Therefore, it becomes a gift. I had found a tutorial ages ago that gave me the idea for it. I will probably put up my own here shortly since I didn't use one anyway.
Sorry for the frantic blogging, but I'm running on adrenaline! I hope you like these ideas and that they inspire you to create!
Working Miracles,
Margo

Monday, December 13, 2010

Six Crafty Gifts in Five Days!


Darlings!
Now that I am on the road to recovery, I've got a lot of crafting to make up. Every year at my children's school they put on an "Angel Store". This is a chance for the kids to buy gifts for their parents, siblings and so on. The school asks that each family send in six handmade gifts for the store. The items are all put together to form the shop. Then the kids purchase items for low amounts. Nothing is priced over $5.00. Pretty neat, right?
As you've noticed, I've been sick. Well, guess what? The six items are due on Friday! How many do I have made? You guessed it....NONE! Time to roll up my sleeves and get these made. I'm going to share them with you as I complete them. Ready?

Craft 1 Sleeping Mask


Here's what we need:
- 2 12x6 scraps of fabric (can be same color)
- 10inches elastic
- needle and thread/ sewing machine
- 30 mins

First thing, make a pattern, or use mine. Just copy and change the image size to 10x6.


Next we cut out two of these and mark where the elastic band will need to be. ( Make sure you mark on the wrong side of the fabric). Place your two masks right sides together with the elastic sandwiched in between. Like so:


Be sure that your elastic is laying flat. A twist in it will ruin your mask! Now, simply pin all the way around. Starting at the nose, stitch around your mask leaving and opening to turn it right side out. I did mine by hand, but the machine will work even better. Once we've turned the mask right side all that's left is to stitch up the opening. I made these once before and put dried herbs inside to promote relaxation. You can also stuff them with some batting or add a layer before you stitch the sides together.
Not bad, right? Simple, thoughtful and homemade. What more could you want in a gift? Now I've got to start brainstorming on the other five gifts! Feel free to share your ideas for last minute handmade goodies!

Happy Crafting,
Margo

I'm Still Here!

Readers!
So sorry I've been MIA for a month! Thanksgiving was a lot of work and to top thing off I've been super sick. Last week I finally broke down and went to the doctor. Strep throat. Yuck. I'm starting to feel like my old self again. My ears are still plugged, though. Any ideas how to clear them? I've gotten so behind on everything! My house is a mess, the kids and hubby are barely hanging on, and I've done zero Christmas shopping. ZERO!!! This darn sickness has cost me so much.
I've been too sick to even be crafty. :( Now that the antibiotics are finally doing their thing, I've got to kick it into overdrive!

Thursday, November 11, 2010

Scarflette How to


My Darlings!
I'm finally back. Whew! Don't ask me what I've been doing, I don't know. It just been one of those times when you never get a moment to rest. After Halloween, life became a blur of candy wrappers. Now I am back to crafting.
So this is what I saw on a lovely blog called I am Momma.


She brilliantly made her scarflette from an old sweater. Well, I didn't have a sweater to cut up, so I decided to make one from "scratch".
I fully admit that I am not a knitter. I've tried and tried, but I just don't have the skill or patience! So I lived in a world without knitting :(. Until... I found this:


This, my friends, is the Knifty Knitter! It changed my life. Close to five years ago I found this little wonder at a craft store. I can make hats and scarves in a short amount of time, and without counting! This is what I used to make my scarflette, if you knit or crochet, power to you.
The first step is to knit a 2- 2 1/2 ft long rectangle. On the knitter this is a tube. Now once that is done, finish the ends. I simply put the two ends together across each other and using the same yarn stitched the ends on three sides.


You want to leave the edge by your neck open, to make it easier to slip on and off. Lastly I simply attached big buttons. I love it!


I tried to sew on snaps so that the scarflette could be opened and closed, but it just wouldn't lay right. The knit stretches pretty easily to fit over my head and hair, so I don't mind it. I hope this tutorial was easy to understand and follow. Love you all bunches!

Monday, November 1, 2010

Happy Halloween!


I'll be back to crafting this week! Let me share our Halloween costumes with you:

Thing 1 as Darth Vader/Annakin
He wanted to wear the helmet the whole time, but mother knows best. I would have ended up carrying it the whole time! He's trying to look menacing in the photo.

Thing 2 as Harry Potter
He wanted to carry a broom, wand, and sword (Chamber of Secrets). I don't think so.

Yours truly as Rosie the Riveter
The smudges on my face are supposed to be there. FYI, I would never have made it in the 50's. Pin curls are a real pain! I used an entire package of bobby pins to do my hair.
Now our house if full of candy and costume wreckage. How about yours? Did you dress up? I've got some new projects saved to share with you. By the way, is anyone interested in the how to for the tattoo necklace? I didn't get any comments so I'm not sure if I should post a tutorial or not. Thanks for reading!
Simply Riveting,
Margo

Wednesday, October 20, 2010

Zipper cuff Tutorial- Super easy!


My Readers,
Here's a very simple craft which takes practically no time at all! The longest wait is for the hot glue to cool. Start with a simple zipper, any size as long as it will go around your wrist.

(excuse my nails, I have 2 boys!)

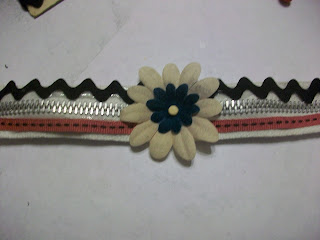
Now we just need to round up some trimmings. I use anything from buttons, to keys, to rick rack and lace. Here's what I put together:


Time to get the glue gun good and hot. I have a love/hate relationship with the glue gun. It's so perfect and quick that I love it. But...I have never completed a project without burning myself and cursing the gun. Onward we go! Plan how you want your bracelet then simply glue the ribbon and trim in place.


Easy right? I told you. Now, simply let the glue cool and sew snaps on the ends. Totally done!


Try experimenting with the zippers. I did some half zipped with fabric behind the opening. I also made some with two zippers stacked together. Have fun!
I hope you enjoy and as always I'd love to see your finished projects! Another tutorial is coming this week, so maybe look into buying some shrink plastic. Trust me, this craft is awesome.
Love to you all!
Margo

Blog Award!


Look what I just received from my friend Chrissy! Isn't she sweet? My first blog award....hmmm so many people to thank. I forget the little people who helped me get here. Kidding of course, probably as close as I'll get to an Oscar.
So here are the nifty rules to this charming award:

1. Post who gave you this award
2. State 10 things you like
3. Give this award to 10 blogger friends and notify them with a comment

Sounds a lot like tag doesn't it? Here are my 10 things I like. In no particular order,

1. Felt, but you probably knew that already
2. Video games. I'm a fairly regular gamer, bloody and scary games too
3. Dr. Seuss, a life long love
4. Baking- not cooking, just baking
5. Bob Dylan- kind of an obsession
6. Thursdays, better than Wednesday and less pressure than Friday
7. Swimming
8. Black and White movies, especially with Cary Grant.
9. Trying on shoes I have no intention of buying
10. Getting the mail- there's always a chance of a surprise
Surprised by any of them?

Here's who I've given my award to: How about Orange, Kojo Designs, Samster Mommy, Emily, Dawn, Chrissy, Remodelaholic, Ms. Kasten, Miranda, and my two cousins Ben and Emilee!
That's right eleven. Couldn't help myself.

Stay tuned for a tutorial tonight or tomorrow! And I'll try to get the text color fixed.

Saturday, October 16, 2010

Book Project


Reader,
I have been browsing projects online most of the week and I've noticed a disturbing trend. More and more projects seem to involve destroying books! Does this bother anyone else? I was raised in a house where books where cherished. Reading is a favorite pastime for me.I remember being scolded several times on how I treated my books as a child. My dad didn't like books stacked on their sides even. And if you lain an open book face down....Wow! "You're breaking the spine!" To this day I cannot put a book down that way. And if I see one, I find a scrap of paper to bookmark the readers page.
These projects I see, involve drilling through books, breaking the spines, tearing the pages, and more. I can't do it. Even a book from a thrift store is still sacred. In these times of online everything, maybe people don't feel the same about books.
I frequent our public library on a weekly basis. Perhaps the fact that I am used to sharing my books with the city has given me a different perspective on book care. Since I am just borrowing the book I treat it as thus. I hope others take the same consideration.
Sorry, if this is preachy. I am aware that I have an extreme reverence for books. I have never put a readable book in the trash. I hope I never do. I can see the beauty and art in taking an unused item and changing it into something usable. But I can't do it with books. When is a book not a book? It's still usable.
Please, readers, find me a craft to use up my magazines! I have no feelings for them. Or the countless half filled coloring books littering my home! But let me read my books.
Do your part! Save a book!
Thanks for reading! No more preaching for a while, crafting has resumed.

Curling up with a book,
Margo

Monday, October 11, 2010

My Weekend


Dearest,
So busy this weekend! And I wasn't even working. We are planning a move at the end of the month so I should be packing constantly, right? Well...I'm trying to finish about 20 craft projects before the move. I'm positive that I'll loose my momentum if I pack these crafts. Are you like me? Do you have several half-finished projects around your home? Here's a few I finished this weekend at least!

Freezer Paper Stencil Throw Pillow
Do you know about freezer paper stenciling? I figured I was the last to hear about this. I started doing stencils like this almost a year ago. I found the octopus online. I love it!

Felt Pillow Brooches
This is a new craft I'm toying with. My friend Chrissy over at Chrissy in America did a version for her daughters girl scout troop and I was inspired. I decided to try them with some stuffing for more dimension. I think they'll be cute on a purse or scarf.

Over the Elbow Gloves
So this is a season craft I decided to pick up again now that the weather is getting cooler. These are simply adorable socks I've cut the feet off and attached to gloves. Perfect for those 3/4 length sleeve coats. I usually make and sell these over the winter.
Felt Flower Brooch
I saw a tutorial on I am Momma for these blooms as a belt and decided to try my hand at it. I'm thinking brooch instead.

School Uniform Hair Accessories
I made these to sell to the girls at my boys school. The handbook says they must wear only school colored accessories. Not sure if they'll sell, but figured it was a different demographic so why not?

Pretty busy right? No packing, but lots of creating. Did you make anything this weekend?
Thanks for reading!
XO,
Margo

Wednesday, October 6, 2010

Owl Hairclip Tutorial


Hello Darling!
Ready to craft? Here's what we need to start: Four colors of felt(browns, white, and a color for the beak), I just used scraps from other projects, you don't need a lot, embroidery thread in black or brown (seed beads can be used instead), a bobby pin or other flat hair clip, needle and thread. Got it all? These are a very simple and quick craft. I made three or four while watching TV with no problem at all.
Ok, so here's my pattern for you.


I'm still trying to figure out the best way to post patterns so bear with me! Click on the image and copy and paste it in to photoshop/paint , size it to approx 1/4 of a regular size paper. Grr! I know, sorry, I'm working on making this easier for you!
Once you've got it all printed cut your pieces out. You can use the colors pretty much anyway you want. I like to keep mine in a semi-natural color scheme, but if I were making them for little girls I'd use more fun colors.
Now we're all set to sew. I start with the wings first and sew in a regular running stitch around them. Next place your eyes and beak and sew them in place. I used embroidery thread for the eyes, but I have also used black seed beads. I suggest just using what you have on hand. If you have neither, use a black marker and go for it. Here's where we are:


Now, before we so the back on, we need a place to insert our hair clip. Fold your back piece in half lengthwise and cut two small snips along the fold. When we unfold we have a small loop to secure our clip, see? The nice part, you can wear this clip on either side of your hair by simply turning the clip around before it goes in the slits.

All that's left to do is sew the front and back together. I know, mine is already done. I forgot to take a picture before I sewed it. Voila!


Isn't he sweet? And so easy, right? Here are two of the lovelies I finished last night. I attempted a barn owl.


You can see on the white one I tried a different technique around the eyes. I think the long stitches from the center look more like feathers. Have lots of fun making little owls to wear!

Hope your week is "flying" by!
Margo


Check out the Link Parties in the Sidebar!

Tuesday, October 5, 2010

Upcoming Tutorial


This is what I'm working on tonight! Hopefully the tutorial will be up tomorrow. See you then!

Thursday, September 30, 2010

Halloween Thoughts


Reader,
So now that it is the last day of September I can officially focus on Halloween. Truthfully, I've been thinking about Halloween 2010 since November 1st 2009! As soon as the makeup is wiped off, and the candy combined in to a communal dish (this is how I keep my kids from fighting about it), and tasted, my thoughts turn to my costume for next year.
I love to dress up in costumes. Always have. Probably comes from having parents who majored in Drama in college. Early on, my brother and eye would scour thrift stores for clothing to make our pretending more real. I didn't play princess or fairy, it was Sherlock Holmes or GI Joe for me. My parents were always into Halloween too. I remember watching them get ready for the holiday. They would hire a sitter and go to costume parties every year. Often they won top prizes too. My mom usually made our costumes and Dad made the props and did the make up. We'd head over to my oma's (that's my mothers mom) neighborhood and meet up with my cousins. Trick or treating was a family activity. Extended family too.

It's not the same for my boys. I have and older brother who has two children, one is 13 the other 3 months. One is too old to trick or treat with mine and the other too young! My sister is 20 and usually walks with us as we take the boys house to house. My mom too joins in whenever able. I wish I could create costumes for my kids to wear, but really, its hard to compete with store bought these days. Remember when it was just a printed plastic sheet and lousy mask. You couldn't ever see or breathe through those masks! But now, fake muscles and everything, I can't compete! Sewing or price wise!
Every year for the past 5 years (I think) my uncle (Dad's side) has thrown a wonderful Halloween party. It's very kid friendly. Not too scary and lots of treats. We love it. We all dress up, even my Grandma! There's chili and other snacks, pop and beer, and lots of funny costumes. My aunt and uncle spend a lot of time setting up Halloween decor. There is even a "spook walk". We walk a path decorated with creepy tombstones and scarecrows, waiting for the spooks to jump out (usually my cousins and brother). After the walk is a large game of hide and seek. We play in teams and it goes on for hours.
I think my boys are getting a different kind of Halloween than I did, but maybe a better one. The party is usually the weekend before the actual holiday so they still get to trick or treat. I get to dress up, play and see family. I also get to watch them trick or treat. It's great to have that special time watching them ring the doorbell, learn to say thank you, and then run to me telling me what they got. My parents missed that. With a crowd of cousins, we were always running ahead of the grownups. I get to hold my boys hands a little longer since it's just us. That's quickly becoming my favorite part of Halloween....okay, after costumes.


What about you, reader? How do you celebrate? What was your favorite costume as a child? Do you make your kids costumes? Let's share.
Once upon a midnight dreary,
Margo

Tuesday, September 28, 2010

Update


You may notice a new gadget on the sidebar. This is a little joy I wish to share with you all. My boys say the strangest things and I think you'll get a kick out of reading them, so take a peek every so often and have a smile!

$1 Craft!


Readers,
That's right, just a dollar. Yesterday I was in one of my favorite parts of Target, the dollar aisles! I came across this bag of silk leaves.


Don't ask me where there are leaves that purple. I did however love the red and orange leaves. Those were worth the dollar price tag. SOLD.
First step is to find a hair clip or headband you can use to attach the leaves to. Mine is a four inch hair clip. I know, its huge, I have thick hair so I was thrilled to find a clip that could hold my hair.


Next, grab your craft glue/hot glue and attach some leaves. What do you think?


If you pick up your own bag of dollar leaves I'd love to see what you come up with. I'm getting in the fall mood, finally. This is the first week in Kansas we haven't been up to 90. Now I've got the Halloween Fever. I love costumes and only need a small excuse to be in one. It's rubbing off on Things 1 and 2. I'm proud and worried at the same time. My sewing skills leave a lot to be desired and they constantly come up with ideas for dressing up.
I hope you enjoy this small autumn craft! Don't forget to sign up for my give away over at Live Large 4 Less! It is running until Friday, hurry!

Love and apple pie,
Margo

Friday, September 24, 2010

Giveaway!

CLOSED
It's my very first giveaway! Shout out to Emily over at Live Large 4 Less! She has given me an awesome review and you all a chance to win one of my items! Totally free, people. I'm springing for shipping and everything. Now is your chance to have a one of a kind statement necklace. The giveaway is for one of my awesome (if I do say so myself) spoon pendants. These items are a treat for me to make and I think it show. Head over to her blog to get the details and enter!

Thursday, September 23, 2010

Earring Organizing


My Readers,
If your anything like me, you are constantly in need of organizing. Everything from the garage, to the refrigerator, to my jewelry box. I've decided to start with the simplest and least messy. The jewelry box.
I have a lot of jewelry. I admit it. One of the messiest items is dangling earrings. I can never keep them paired up and they seem to constantly get tangled. I've found a simple and stylish solution. Interested? You know you are. Here you go:
Start by getting your supplies together. We need an empty frame with no glass. The size depends on how many pairs of earrings you have (or plan to have). I happened to have a plain black 8x10 that wasn't being used. Dollar stores sell all different kinds if you want something more ornate. The other item you need is plastic canvas. It looks like this;

Most likely you've seen it but never used it. I picked mine up at a craft store, but I've seen it at Walmart too. It comes in various sizes and color, choose what works best for you. The only other supplies you need are fishing line (or other strong clear line) and scissors.
First step is to cut your canvas to fit your frame. After you do that it's time to affix the two. I cut four inch lengths of fishing line. I think I used eight of them. Place your canvas in the frame and simply thread the fishing line through your canvas and tie the ends together around your frame.

Sorry about the photo. By nature, fishing line is hard to capture. I tied the line
twice on each side. Trim off the excess line and your earrings are ready to hang! That's it!

I also added some large jump rings in places so that I could attach my hoop earrings
too. I hope this gives you some relief of life's clutter! Thanks as always for reading!

Love,
Margo

Monday, September 20, 2010

Eco-Chic!


So I was browsing around the other day/week and came across this lovely idea on Aunt Peaches. Want a brilliant idea! Right away I ran out to dollar tree to get some plastic cups. I did mine a little different then her and thought I'd share both styles with you.
On Aunt Peaches she used regular scissors to cut her cup into large pieces. I used scrap booking scissors that had a wavy blade. I also snipped mine to to smaller pieces and didn't punch as many holes in mine as she had done. Once they were in the oven mine did not melt as quickly as I had thought they would. I cranked up the heat and they turned to puddles. My husband pulled the tray out and told me, "Looks like we should have left them alone." I left them on the tray overnight and sulked about my own mistake.
Side note: Don't you hate it when you spend hours on a craft and the result is blah?
Two nights later I decided to sift through the mistakes to see if anything was salvageable. Surprise! I didn't think they were ruined any more! I began adding jump rings and the necklace just took shape. I really do love it.
My next plan is to try multiple colors. Don't you think purple and blue would look lovely mixed together? And maybe earrings? I also have a star punch I bought in a dollar bin. I'm going to see if it will punch through the plastic.
WARNING! Many plastics do release toxins when they melt so be careful and make sure you have windows open!


In other news, I have a give away coming up at my friend Emily's blog. She's a hip lady who knows how to save money. Check it out and save big!

Thursday, September 16, 2010

For the little kitty...

Reader,
Here is a little craft to keep your skills sharp. It also makes your cat/dog look hip. Side note for me, it makes my husband shake his head and say, "really?" Start with your run of the mill pet collar. I think mine was a Dollar Tree find. Make sure your collar is sized to fit your pet.

Now search through your collection of buttons (we all know about mine now). I decided to make mine in the same color family, and green really makes his yellow eyes pop. ;) I also chose a variety of sizes and styles. Don't choose buttons that are too big, otherwise your pet might get it caught on something!

Now sew. Sew like the wind! (Three Amigos joke, anyone?) My cat is small enough that the stitches are hidden by the extra material of the color. I sew them all on with one shot, but you certainly can tie off each button.

All done! Now find your pet and enjoy that look of contempt they give you now that you've made them pretty! I hope you enjoy this little how to! Thanks as always for reading and following. If you are reading but not following...why not? That's semi-piracy. Not really.

Love and Whiskers,
Margo