
My Readers,
Here's a very simple craft which takes practically no time at all! The longest wait is for the hot glue to cool. Start with a simple zipper, any size as long as it will go around your wrist.

(excuse my nails, I have 2 boys!)
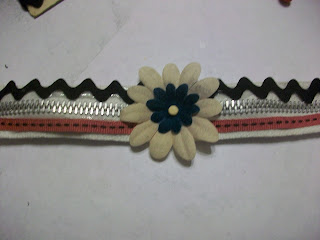
Now we just need to round up some trimmings. I use anything from buttons, to keys, to rick rack and lace. Here's what I put together:

Time to get the glue gun good and hot. I have a love/hate relationship with the glue gun. It's so perfect and quick that I love it. But...I have never completed a project without burning myself and cursing the gun. Onward we go! Plan how you want your bracelet then simply glue the ribbon and trim in place.
Easy right? I told you. Now, simply let the glue cool and sew snaps on the ends. Totally done!

Try experimenting with the zippers. I did some half zipped with fabric behind the opening. I also made some with two zippers stacked together. Have fun!
I hope you enjoy and as always I'd love to see your finished projects! Another tutorial is coming this week, so maybe look into buying some shrink plastic. Trust me, this craft is awesome.
Love to you all!
Margo
No comments:
Post a Comment