Tuesday, July 26, 2011

T-shirt scarf Necklace! Oh Yeah!


Hello Beautiful!
Remember the tutorial I showed you on T-shirt scarves here. Well, these 100+ degree temps haven't been scarf friendly. How about we swap them for necklaces instead? I thought you'd like that!
If you have a scarf already finished simply snip off four loops of the scarf. Fold them and half and cut three so you have six equal pieces of jersey. If you are starting with a untouched T-shirt, lay it flat and cut off the bottom hem. Now cut four more loops from the bottom of the shirt. Cut through three loops so you have six equal pieces of T-shirt. I hope that made sense.
Gather six ends together and stitch them together as so.
I doesn't need to be pretty just, secure. Time for beads. You can use wooden beads, glass, beads, or pony beads. I found some cute plastic star beads I had stashed away. Unfortunately they were hideously colored. Spray paint to the rescue! After painting them a soft gray(because that's what I had) I strung them on the T-shirt strands in a semi-organized fashion. Mainly, I made sure that each strand had a decent number. Once that was done I sewed together the other ends.
Now take your spare loop that you cut. Snip it in to three equal strands and sew these together at the end. Braid them.


The length of the braid depends on where you want your necklace to fall. I made my braid long enough so that the necklace could slip over my head. Measure and decide how long is long enough. When you get there, sew the ends together and trim off the excess. Save these scraps!
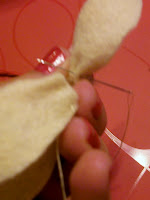
Sew your braid to your beaded strands. Once again, security over beauty, we are going to cover this up.

Let's cover it up fast! Remember those scraps I told you to save? This is why. Wrap them around the joint of our two pieces. I wrapped over my beginning and then stitched the end down.

So far nothing has come undone. Do the same with the other side, and wear with gusto. Bask in the compliments!

Here is one I made with wood beads too!


Keep Crafting!
Margo

Tuesday, July 19, 2011

Felt Lotus Hair Clip Tutorial


Sweetheart!
Here I am with another tutorial for you! Time to make a hair accessory! This horrible heat makes me want to shave all of my hair off. Maybe pulling it up in a cute clip will keep my mind off it for one more day. Maybe...
First off I'll tell you what you need:
- 1 sheet felt acrylic/wool
- liquid fabric stiffener approx 1/4 cup
- needle and thread
- spring back clip/ hair comb
- scissors
Step one cut your petals. You need fifteen of the long petals and three of the small ones. After they are cut separate the long in to groups of five. These are our layers.


Step two, with a length of thread start a running stitch in the first petal of the first layer.
Continue with the same thread through the rest of the petals in the first group. When finished, pull, the thread tight, carefully. The petals will form into a circle when the thread is tightened. Sew a few stitches to connect the first and last petals together. Complete the two other groups the same way.
Step three, place your three layers on top of eachother. Make sure you stagger the petals to give your lotus more depth. Stitch these layers together.

Step four, the center! Take one of your three little petals and roll it in to a loose tube shape. Holding it in place, wrap it with another small petal, and then the final petal. Sew together by running the needle through the tube several times. If the center seems to be too tall, cut the bottom to shorten it. Whipstitch the whole thing to the center of your flower petals.
Now for the magic part! The first time I made this flower it was lacking shape. A lotus stands up more and the felt just wouldn't stay in place. I had bought fabric stiffener for a previous project and decided, why not? So I mixed 1/4 cup stiffener, with 1 cup warm water, put it in a spray bottle and magic happened. Make sure you have a dish towel under your flower, one you don't care about ruining. Spray until the fabric is damp but not soaked. The spray will leave spots at first but it dries clear. (I've only used lighter colors so far) Shape the petals after you've sprayed them. Let the flower dry overnight and it's done! Add leaves if you want then glue on a clip or comb.
Pretty right? I'm working on a magnolia right now using the same technique.

Wednesday, July 6, 2011

Deep Apologies!


I'm a liar! So, sorry! I've been missing for so long I know. Once the two things got out of school we took a week trip to Califorinia and I haven't had a moment to do anything it seems. That's a lie, too! I just have been lazy, I guess. Forgive me? Please? Thanks so much!
Onward! Still interested in a T- shirt necklace tutorial? I'm going to put out another choice. What about a felt lotus hair clip? Like this?

Comment to let me know! Otherwise I may do a random tutorial. Which will be fun too! And stay tuned for a giveaway this month! I do owe you that :)