Thursday, November 10, 2011

In Flanders Fields


Every year my mind goes back to this same poem.
I encourage you all to read it and share it. Please follow the attached link and read the touching history of the poem so that you too can remember it on this special day. It is a beautiful story.
In Flanders Fields
In Flanders fields the poppies blow
Between the crosses, row on row,
That mark our place; and in the sky
The larks, still bravely singing, fly
Scarce heard amid the guns below.
We are the Dead. Short days ago
We lived, felt dawn, saw sunset glow,
Loved and were loved, and now we lie,
In Flanders fields.
Take up our quarrel with the foe:
To you from failing hands we throw
The torch; be yours to hold it high.
If ye break faith with us who die
We shall not sleep, though poppies grow
In Flanders fields.
-John McCrae
The history of this lovely poem;

http://en.wikipedia.org/wiki/In_Flanders_Fields

Sunday, October 30, 2011

BOO!

Happy Haunting!
Its almost my favorite holiday again! Saturday was my aunt and uncle's annual Halloween Bash! I really do love it. Its such a great time. The best part is that it is fun for kids and adults. Costumes are encouraged/enforced for grown ups. My kind of party!! There is a spook walk, kid friendly, and a hay rack ride, chili, desserts, and a rousing game of hide and seek in the dark. Jealous? Here's some photos of my family's costumes this year


Dark Spiderman/ Thing 2

Darth Revan(Star Wars villain)/ Thing 1
Rocky the Flying Squirrel/ Yours truly
Rocky and Bullwinkle/ Myself and my husband Ty
Not bad, huh? We have such fun with our costumes.We try to always make as much as we can. The goggles are the only part I didn't make and they were free from a coworker of my husband. He made his antlers and bought the hat at the dollar store! I wish I had taken pictures of all of the other relatives and friends that were there. If they email me any I'll be sure to post them! What was your favorite Halloween costume? Have a safe and sugar filled Halloween!!

Monday, October 10, 2011

What's that? A Giveaway!!


Look what I'm giving away! Firstly a magnolia hairclip and secondly a hydrangea headband. These are are being given away over at my lovely friend Mindy's blog. So buzz over to marigold road and enter!
Her blog is super awesome and she makes wonderful, beautiful creations! I wish you all the best of luck in the giveaway!
And welcome to all the newbies! I look forward to sharing my craftiness with you! Browse around, look and try out some tutorials and have fun!

Sunday, September 18, 2011

Squeaky Clean Now!


Two posts in two days! Shocking isn't it? I feel so relieved after today. I love my sister and my cousin but no more double showers! Lots of work. Lots of time. Lots of money. It turned out lovely and everyone had a good time. That's the important part. I felt stressed early on, but even I got to relax and talk with family and friends.

Here's a close up of the bunting I made using some scrapbook paper. I used my Cricut and cut onesie shapes. We strung them on clothesline and hung them using miniature clothespin from a craft store. They were relatively cheap and cute to decorate the cake and gift table.


The guests of honor! Aren't they precious? No clue of the sleepless nights and dirty diapers they are in for!

She's going to eat the whole cake! Can you tell who my sister is? What a ham! It was a yummy cake, half strawberry, half vanilla.

Instead of games,(I never like shower games) we decorated onesies for the girls. This was a lot of work for me! Gathering up the onesies, paints, iron ons, brushes, etc. Not to mention one baby is a girl and the other a boy! But it turned out great! People had lots of fun doing it too! We set up three stations for people to decorate when and how they wanted.

We also made sure to get onesies through the first year. That way the babies have hand decorated onesies the whole year through. It's really sweet. I'm glad we did it.


Here is a shot of the table full of finished works! Lovely!

And here is a picture of one of my finished onesies. This one has special meaning. For my cousin, I drew the tree with fabric markers. Then I had her mother and sisters dip their fingers in paint and leave fingerprint leaves. I know, awww.


That's all for now, my lovelies! Tomorrow I will post pictures of my handmade gifts for the shower. And possibly a tutorial this week!

Saturday, September 17, 2011

Baby Shower! Baby Shower!


Hello strangers!
I disappeared again! Sorry, sorry, sorry. I've been planning a joint baby shower for my lovely sister and my darling cousin. Boy, that takes up a lot of time. I've got lots of handmade goodies to share with you. It will all be over tomorrow. So hang in there and talk amongst yourselves. I promise it will be worth it. Plus! I've got a giveaway coming up in the next week! You heard it here first. Kisses!

Tuesday, July 26, 2011

T-shirt scarf Necklace! Oh Yeah!


Hello Beautiful!
Remember the tutorial I showed you on T-shirt scarves here. Well, these 100+ degree temps haven't been scarf friendly. How about we swap them for necklaces instead? I thought you'd like that!
If you have a scarf already finished simply snip off four loops of the scarf. Fold them and half and cut three so you have six equal pieces of jersey. If you are starting with a untouched T-shirt, lay it flat and cut off the bottom hem. Now cut four more loops from the bottom of the shirt. Cut through three loops so you have six equal pieces of T-shirt. I hope that made sense.
Gather six ends together and stitch them together as so.
I doesn't need to be pretty just, secure. Time for beads. You can use wooden beads, glass, beads, or pony beads. I found some cute plastic star beads I had stashed away. Unfortunately they were hideously colored. Spray paint to the rescue! After painting them a soft gray(because that's what I had) I strung them on the T-shirt strands in a semi-organized fashion. Mainly, I made sure that each strand had a decent number. Once that was done I sewed together the other ends.
Now take your spare loop that you cut. Snip it in to three equal strands and sew these together at the end. Braid them.


The length of the braid depends on where you want your necklace to fall. I made my braid long enough so that the necklace could slip over my head. Measure and decide how long is long enough. When you get there, sew the ends together and trim off the excess. Save these scraps!
Sew your braid to your beaded strands. Once again, security over beauty, we are going to cover this up.

Let's cover it up fast! Remember those scraps I told you to save? This is why. Wrap them around the joint of our two pieces. I wrapped over my beginning and then stitched the end down.

So far nothing has come undone. Do the same with the other side, and wear with gusto. Bask in the compliments!

Here is one I made with wood beads too!


Keep Crafting!
Margo

Tuesday, July 19, 2011

Felt Lotus Hair Clip Tutorial


Sweetheart!
Here I am with another tutorial for you! Time to make a hair accessory! This horrible heat makes me want to shave all of my hair off. Maybe pulling it up in a cute clip will keep my mind off it for one more day. Maybe...
First off I'll tell you what you need:
- 1 sheet felt acrylic/wool
- liquid fabric stiffener approx 1/4 cup
- needle and thread
- spring back clip/ hair comb
- scissors
Step one cut your petals. You need fifteen of the long petals and three of the small ones. After they are cut separate the long in to groups of five. These are our layers.


Step two, with a length of thread start a running stitch in the first petal of the first layer.
Continue with the same thread through the rest of the petals in the first group. When finished, pull, the thread tight, carefully. The petals will form into a circle when the thread is tightened. Sew a few stitches to connect the first and last petals together. Complete the two other groups the same way.
Step three, place your three layers on top of eachother. Make sure you stagger the petals to give your lotus more depth. Stitch these layers together.

Step four, the center! Take one of your three little petals and roll it in to a loose tube shape. Holding it in place, wrap it with another small petal, and then the final petal. Sew together by running the needle through the tube several times. If the center seems to be too tall, cut the bottom to shorten it. Whipstitch the whole thing to the center of your flower petals.
Now for the magic part! The first time I made this flower it was lacking shape. A lotus stands up more and the felt just wouldn't stay in place. I had bought fabric stiffener for a previous project and decided, why not? So I mixed 1/4 cup stiffener, with 1 cup warm water, put it in a spray bottle and magic happened. Make sure you have a dish towel under your flower, one you don't care about ruining. Spray until the fabric is damp but not soaked. The spray will leave spots at first but it dries clear. (I've only used lighter colors so far) Shape the petals after you've sprayed them. Let the flower dry overnight and it's done! Add leaves if you want then glue on a clip or comb.
Pretty right? I'm working on a magnolia right now using the same technique.

Wednesday, July 6, 2011

Deep Apologies!


I'm a liar! So, sorry! I've been missing for so long I know. Once the two things got out of school we took a week trip to Califorinia and I haven't had a moment to do anything it seems. That's a lie, too! I just have been lazy, I guess. Forgive me? Please? Thanks so much!
Onward! Still interested in a T- shirt necklace tutorial? I'm going to put out another choice. What about a felt lotus hair clip? Like this?

Comment to let me know! Otherwise I may do a random tutorial. Which will be fun too! And stay tuned for a giveaway this month! I do owe you that :)

Wednesday, May 4, 2011

Mother's Day

Dearest,
It's almost Mother's Day! I wanted to share some past gifts I've given my own mom. I try to give her something handmade, because a lot of my creativity comes from her!


This is what I am giving her this year. A handmade coinpurse. They are very easy to make and pretty fast too. The fun part is coming up with a design for the outside.


This idea is one of my favorites. I took a vintage compact (a new one will work too) and sized a picture of the two of us to fit it. You can seal it with Mod Podge or thin plastic.


Here is a necklace that is great for any mother. A lovely bird's nest made from wire. All you need is the chain and three beads. I used a white pen to draw spots on my 'eggs'.


Pillow? If your mom is anything like mine, she loves decorative pillows. There are oodles of tutorials online for felt pillow. I didn't even have to buy a pillow form. I took measurements of one of the existing pillows on her couch. Bonus, you get to know she uses it.


How do you feel about personalized nesting dolls? These were actually a Christmas gift for my mother. I have a very talented cousin who was able to paint these for me. My idea, his talent. Order your own here. He also does peg people!


Lastly, I made silhouettes of the grand kids for her. Pretty easy with photoshop. The hardest part was getting a profile picture of the kids. Speaking of, I'll have to make to more of these! My brother has another son and my sister is expecting. Mother's day next year is covered!


I hope you all have a wonderful day. Remember the most important gift you can give your mother, is a thank you. Speaking as a mother those two words mean a lot. That, and sleeping in!


Daughter, Mother, Wife, Sister,

Margo


Sunday, April 24, 2011

Happy Easter!


These lovelies were dyed using neckties. Love them! And so relieved it worked.

Thursday, March 10, 2011

Felt Flower Hairclip


Hello Darlings!

Sorry I've been gone so long, again. Between a six day visit from my in laws and having an new heater/air conditioner installed, well life's been busy. Now that things are finally settling down I plan to get some much needed crafting and blogging done. Thanks for your patience!

Today's tutorial is for this lovely spring flower hair clip. The weather has finally started to warm up and I'm thinking on all things spring. This clip looks much more complicated than it actually is, lucky you!

*Sorry for the picture quality, forgot to charge up my good camera*


First thing, gather your materials: A sheet of felt, I use regular eco felt most of the time, but decided to try the stiffened felt this time ( I like to finished look of the stiffened, but it's a pain to work with), you need a needle and thread the same color as your felt, scissors, a spring back clip, and hot glue or E6000.


After you've gathered your supplies you need to draw three size petals for a pattern or print off mine here. I cut five of the largest, four of the medium and three of the smallest.

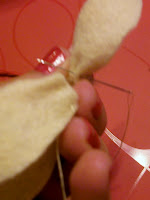
Once all the petals are cut, take one of your largest petals and sew a running stitch across it, mine is usually just two stitches. Continue stringing on the remaining large petals like so.


Now pull your thread tight and "shape" the petals as you do so they gather in the right places. Either tie your two ends together or make a connecting stitch and tie it off. The finished should look like this.

Complete the remaining petals in the same fashion.


All that's left is to glue them together largest to smallest. Use pins if necessary to hold while the glue cools/dries. Once that's done flip it over and attach the spring back clip using the petals to hide it.


Done! If you want you can add leaves to the back or use a bigger clip and attach two flowers. I hope you enjoyed the how to, see you next time!

Loving Life,

Margo


Tuesday, February 8, 2011

Button Purse Tutorial


Sweetest Readers,
Sorry it's been so long! Like much of the midwest snow has cramped my style. I've been occupied with having Thing 1 and 2 home from school. Snow days used to be so great. Now...well, it's great sleeping in, but by 1 PM I'm tired of yelling, "Leave your brother alone!" and "One more time and there'll be trouble!" You understand.
I did get some work on Valentines done. Remember the felt valentine I posted here? I wanted so badly to make them, but knew I wouldn't have time. I decided to make them with construction paper with the Things. Here's how they turned out.


Not bad. I only had them make them for their teachers and the secretary. Oh, and the lunch lady. My mother was a lunch lady for 13 years, so I always try to include gifts for them during holidays. Please, remember your lunch help, they are among the list of under-appreciated!

On to the tutorial! Start with a simple clutch purse. Mine cost me 25 cents at the thrift store. Make sure your clutch has a clean flat surface. Start gathering buttons. Since mine was tan, I went with browns for my buttons. Once you feel you've got enough, gather more! Trust me, I had to search several times to find enough that matched.
Next, decide what kind of pattern you want on your purse. I've done all sorts. The one I did was with stripes, so that's what this tutorial will show. Be creative! I used a washable marker and a ruler and made stripes going diagonally across the purse.


I free handed the space between my lines, but you might measure if this concerns you. Now, start laying out your buttons on the clutch. I used various sizes of buttons. This is how my looked.


I had to do a lot of switching around to make my buttons look just right. I'm sure I could have done this without making the stripes with identical buttons, but I had enough to, so I did :)
Once you've got the buttons how you like them, transfer them in to piles next to the purse, careful not to mix them up! Grab your E6000 adhesive and start gluing. I have tried this with hot glue as well, and it's just not as clean. Once your buttons are attached, let it set. Simply wash off the marker and your ready to carry this lovely around!
Oh, make sure your marker comes off. I used a crayola washable marker, and it *ahem* wouldn't wash off. I was very peeved. I used, dish soap, hand soap, Windex and some cleaning spray called Awesome. Nothing worked! Just when I had given up hope...I tried something totally out of the box, TOOTHPASTE! It took the marker right off! I don't recommend this for a cloth purse, but on the leather it worked a miracle. Pretty cool, huh?
I hope you enjoyed this how-to. It's a simple craft with stunning results. Happy crafting!


P.S. Here's another purse I made using white and pearlized buttons. I always get compliments when I carry it!