Tuesday, December 14, 2010

TOMORROW!

Readers,
Can you believe it? I get a note from school yesterday that my handmade items are due on Wednesday instead of Friday! What are they doing to me? Forgive me, but there will not be tutorials on everything, because I had to slap together some things fast!
Here's what I've come up with:

Mens Leather Bracelet

This I had made before for my husband using leather cording. His is tied on, so for a gift I made one using ribbon enders. The tutorial for the sailor braid I found here.

Shrink Plastic Keychains

These are a super simply craft to make. Luckily I had shrink plastic that is able to go through the printer. All you need to do is choose an image, (kid's photos would be great for grandparents). Scale your image to double the size you want the finished piece to be. Print it, cut it, punch a hole for your chain, and bake according to the directions. Easy!

Button Earrings

Most of you can probably do without a tutorial on these cuties! Take an earring post, add E6000 glue, press button on, and let dry. Good thing I make these regularly, so no problem having posts and backs in the house.

Record Bowl

You've probably seen one of these before! I made two of these to send to school tomorrow. I'm not sure if anyone will want them. I actually have one I made, that is perfect for throwing my mail into.
Lastly, I made a placemat purse a couple of weeks ago that I was going to sell in my shop. I wasn't thrilled with the unfinished edges so I couldn't really put a price on it. Therefore, it becomes a gift. I had found a tutorial ages ago that gave me the idea for it. I will probably put up my own here shortly since I didn't use one anyway.
Sorry for the frantic blogging, but I'm running on adrenaline! I hope you like these ideas and that they inspire you to create!
Working Miracles,
Margo

Monday, December 13, 2010

Six Crafty Gifts in Five Days!


Darlings!
Now that I am on the road to recovery, I've got a lot of crafting to make up. Every year at my children's school they put on an "Angel Store". This is a chance for the kids to buy gifts for their parents, siblings and so on. The school asks that each family send in six handmade gifts for the store. The items are all put together to form the shop. Then the kids purchase items for low amounts. Nothing is priced over $5.00. Pretty neat, right?
As you've noticed, I've been sick. Well, guess what? The six items are due on Friday! How many do I have made? You guessed it....NONE! Time to roll up my sleeves and get these made. I'm going to share them with you as I complete them. Ready?

Craft 1 Sleeping Mask


Here's what we need:
- 2 12x6 scraps of fabric (can be same color)
- 10inches elastic
- needle and thread/ sewing machine
- 30 mins

First thing, make a pattern, or use mine. Just copy and change the image size to 10x6.


Next we cut out two of these and mark where the elastic band will need to be. ( Make sure you mark on the wrong side of the fabric). Place your two masks right sides together with the elastic sandwiched in between. Like so:


Be sure that your elastic is laying flat. A twist in it will ruin your mask! Now, simply pin all the way around. Starting at the nose, stitch around your mask leaving and opening to turn it right side out. I did mine by hand, but the machine will work even better. Once we've turned the mask right side all that's left is to stitch up the opening. I made these once before and put dried herbs inside to promote relaxation. You can also stuff them with some batting or add a layer before you stitch the sides together.
Not bad, right? Simple, thoughtful and homemade. What more could you want in a gift? Now I've got to start brainstorming on the other five gifts! Feel free to share your ideas for last minute handmade goodies!

Happy Crafting,
Margo

I'm Still Here!

Readers!
So sorry I've been MIA for a month! Thanksgiving was a lot of work and to top thing off I've been super sick. Last week I finally broke down and went to the doctor. Strep throat. Yuck. I'm starting to feel like my old self again. My ears are still plugged, though. Any ideas how to clear them? I've gotten so behind on everything! My house is a mess, the kids and hubby are barely hanging on, and I've done zero Christmas shopping. ZERO!!! This darn sickness has cost me so much.
I've been too sick to even be crafty. :( Now that the antibiotics are finally doing their thing, I've got to kick it into overdrive!

Thursday, November 11, 2010

Scarflette How to


My Darlings!
I'm finally back. Whew! Don't ask me what I've been doing, I don't know. It just been one of those times when you never get a moment to rest. After Halloween, life became a blur of candy wrappers. Now I am back to crafting.
So this is what I saw on a lovely blog called I am Momma.


She brilliantly made her scarflette from an old sweater. Well, I didn't have a sweater to cut up, so I decided to make one from "scratch".
I fully admit that I am not a knitter. I've tried and tried, but I just don't have the skill or patience! So I lived in a world without knitting :(. Until... I found this:


This, my friends, is the Knifty Knitter! It changed my life. Close to five years ago I found this little wonder at a craft store. I can make hats and scarves in a short amount of time, and without counting! This is what I used to make my scarflette, if you knit or crochet, power to you.
The first step is to knit a 2- 2 1/2 ft long rectangle. On the knitter this is a tube. Now once that is done, finish the ends. I simply put the two ends together across each other and using the same yarn stitched the ends on three sides.


You want to leave the edge by your neck open, to make it easier to slip on and off. Lastly I simply attached big buttons. I love it!


I tried to sew on snaps so that the scarflette could be opened and closed, but it just wouldn't lay right. The knit stretches pretty easily to fit over my head and hair, so I don't mind it. I hope this tutorial was easy to understand and follow. Love you all bunches!

Monday, November 1, 2010

Happy Halloween!


I'll be back to crafting this week! Let me share our Halloween costumes with you:

Thing 1 as Darth Vader/Annakin
He wanted to wear the helmet the whole time, but mother knows best. I would have ended up carrying it the whole time! He's trying to look menacing in the photo.

Thing 2 as Harry Potter
He wanted to carry a broom, wand, and sword (Chamber of Secrets). I don't think so.

Yours truly as Rosie the Riveter
The smudges on my face are supposed to be there. FYI, I would never have made it in the 50's. Pin curls are a real pain! I used an entire package of bobby pins to do my hair.
Now our house if full of candy and costume wreckage. How about yours? Did you dress up? I've got some new projects saved to share with you. By the way, is anyone interested in the how to for the tattoo necklace? I didn't get any comments so I'm not sure if I should post a tutorial or not. Thanks for reading!
Simply Riveting,
Margo

Wednesday, October 20, 2010

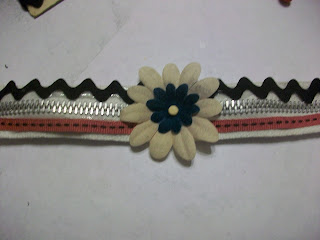
Zipper cuff Tutorial- Super easy!


My Readers,
Here's a very simple craft which takes practically no time at all! The longest wait is for the hot glue to cool. Start with a simple zipper, any size as long as it will go around your wrist.

(excuse my nails, I have 2 boys!)

Now we just need to round up some trimmings. I use anything from buttons, to keys, to rick rack and lace. Here's what I put together:


Time to get the glue gun good and hot. I have a love/hate relationship with the glue gun. It's so perfect and quick that I love it. But...I have never completed a project without burning myself and cursing the gun. Onward we go! Plan how you want your bracelet then simply glue the ribbon and trim in place.


Easy right? I told you. Now, simply let the glue cool and sew snaps on the ends. Totally done!


Try experimenting with the zippers. I did some half zipped with fabric behind the opening. I also made some with two zippers stacked together. Have fun!
I hope you enjoy and as always I'd love to see your finished projects! Another tutorial is coming this week, so maybe look into buying some shrink plastic. Trust me, this craft is awesome.
Love to you all!
Margo